-
Egg Week: Hard Boiled Eggs
This week we are focusing on some of the basics of healthy eating…EGGS! Today we are talking about HOW to get the perfect Hard Boiled Egg. I hate it when I go to bite into the egg and come away with a chalky tasting, grey tinged yolk. And peeling them? Sometimes it’s a breeze, but more often than not I’m picking a million little shell pieces from the egg which seem to be hanging on for dear life!
But NO more! Here are some great tips and tried and true reviews on how to get the PERFECT Hard Boiled Egg:
Step 1: Cooking the Eggs
METHOD 1: Boiled Eggs
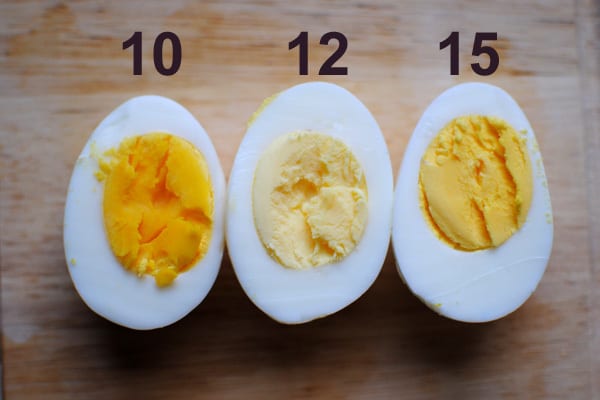
Place eggs in saucepan. Fill pan with cold water until eggs are covered by 1″. (I actually measured this using a ruler. This is science, after all.) Heat water over high heat until it is at a full rolling boil. Remove pan immediately from heat, cover with lid, and leave for 10-18 minutes. When time is up, carefully strain the hot water into sink and place eggs directly into a bowl of ice water. (The water shouldn’t just be cold. It needs to be ice cold. I used a large metal mixing bowl, filled it halfway with cold water, and put a large chunk of ice into the bowl to accomplish this.) Do all of this as quickly as you can safely as the idea is to “shock” the eggs. Let the eggs sit in the ice water for at least 15 minutes before peeling.
Results: This was easy, practically foolproof, and produced delicious eggs. The eggs cooked for 10 minutes had soft, flavorful yolks. The eggs that cooked for 12 minutes and I found the yolks a bit chalky for my taste, but still edible. The eggs that cooked for 15 minutes were way too chalky-tasting for me. But, no grey-green color and nothing tasted of sulfur.
METHOD 2: OVEN BAKED HARD BOILED EGGS
- Preheat oven to 325 degrees F (175 degrees C).
- Put 1 egg in each of 12 muffin cups.
- Bake in preheated oven for 30 minutes.
- Plunge baked eggs in a large bowl filled with ice water until cooled completely, about 10 minutes.

Step 2: Peeling the Eggs
Here are a few tips that seemed to help make peeling the hard-boiled eggs a success:
– Make sure the ice water is super cold.
– Leave the eggs in the ice water for at least 15 minutes. I didn’t find it necessary to crack them before they went into the water.
– Gently tap the egg on a flat surface (I used my kitchen counter) when you’re ready to peel it. Create lots of little cracks all over the egg.
– Do not try to create these cracks by rolling the egg around in your hand. I tried this once. It resulted in a partially squashed egg that stuck to its shell.
– Peel your eggs under cold running water. It doesn’t have to be on full blast, just a little bit. I placed a mesh strainer in the bottom of my sink to catch all the egg shells.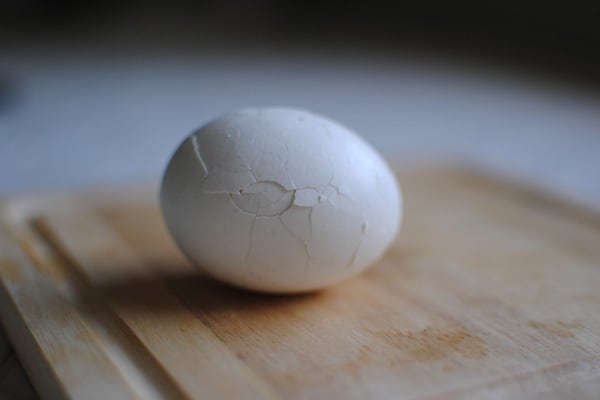
A few more good things to know:
1. Older eggs are generally easier to peel than fresh eggs because as an egg ages, its pH rises and it begins to shrink away from its shell. This creates an air pocket between the egg white and the egg shell.
2. If you’re using super-fresh eggs (eggs bought from a farmer or if you’re using eggs from your own chickens), it’s often recommended that you let them sit for 10 days before boiling them. If you don’t want to wait, you might want to consider steaming them (instead of boiling them). Pour an inch of water into a pot, insert a steam basket and bring the water to a full boil. Place the eggs in the basket, cover, and let them steam for 15 minutes. This should make them easier to peel.
– If you’re really struggling with peeling, gently crack them all over and then put them back in a bowl of cool water for 15 minutes.Stay tuned this week for recipes using hardboiled eggs as well as some of my favorite recipes featuring Eggs!
*Article adapted from TeamBeachbody.com
-
Peanut Butter Fudgy Pops
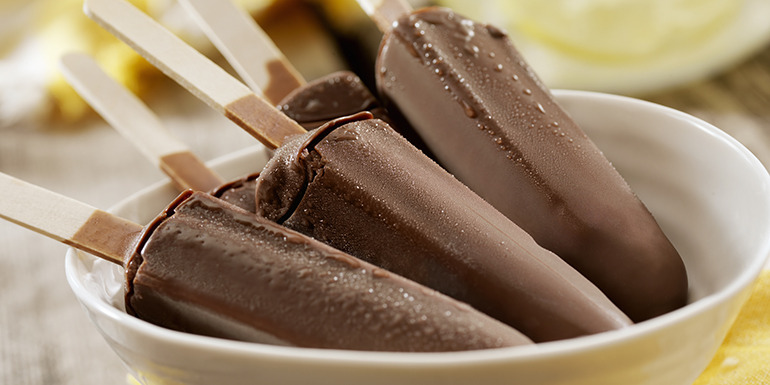
Some things were just meant to go together: oatmeal and raisins, strawberries and cream eanut butter and chocolate. These Peanut Butter Fudgy Pops blend the latter two made-in-heaven flavors into ice-cold pops that taste like a peanut butter cup on a stick — without the truckload of fat and sugar to weigh you down.
Most better-for-you popsicles are usually fruit-based, but these offer something a little creamier. Blend and freeze just three ingredients – Chocolate Shakeology, peanut butter, and milk — and you’ll be enjoying a satisfying, healthy treat that also has 9 grams of protein.
Peanut Butter Fudgy Pops
Total Time: 3 hrs. 10 min.
Prep Time: 10 min.
Cooking Time: None
Yield: 4 servingsIngredients
1 cup reduced-fat (2%) milk
1½ scoops Chocolate Shakeology
1 Tbsp. all-natural peanut butterPreparation
1. Place milk, Shakeology, and peanut butter in blender; cover. Blend until smooth.
2. Pour evenly into four ice pop molds; freeze until hard.
*recipe adapted from Teambeachbody.com